

How To Live Stream From A Video Camera
Video Streaming in Web Browsers with OpenCV & Flask
Streaming live videos from IP Cameras or Webcam with Computer Vision
You took the problem of installing a webcam or a surveillance camera at your home, or function or any identify that you own. Manifestly, you lot would want to be able to spotter the live stream of the video anyplace and anytime you like.
Most of the people use IP cameras (Net Protocol cameras) instead of CCTV (Closed-Circuit Television) for surveillance purposes as they have a much college resolution and reduced cost for cabling. Y'all tin can find the detailed differences between both these systems hither. In this commodity we will be focusing on IP cameras.
IP camera, is a type of digital video camera that receives command data and sends image data via an IP network and require no local recording device. Most IP cameras are RTSP (Real Time Streaming Protocol) based and is therefore "not supported" natively in internet browsers.
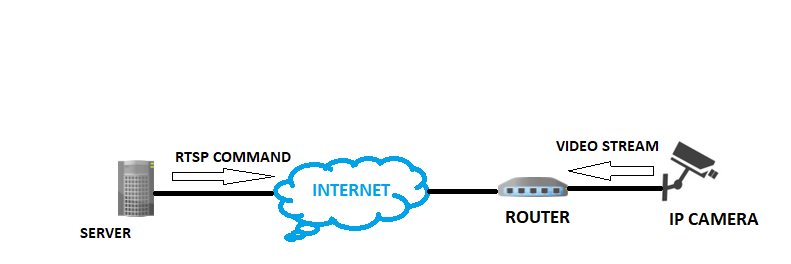
And then how exercise you lot utilize your web browser to view the live streaming ?
In this article we will learn how to do that using Computer Vision.
Figurer Vision is an interdisciplinary field that deals with how computers tin be made to proceeds a high-level understanding from digital images or videos.
For implementing the computer vision part we will use the OpenCV module in Python and to display the live stream in the web browser we volition utilise the Flask web framework. Before diving into the coding function let us beginning know about these modules briefly. If y'all are already familiar with these modules, yous can directly bound to the next department.
According to the Wikipedia, Flask is a micro web framework written in Python. It is classified every bit a microframework because it does not require particular tools or libraries. It has no database abstraction layer, course validation, or any other components where pre-existing tertiary-party libraries provide common functions.
Co-ordinate to GeeksForGeeks, OpenCV is the huge open up-source library for the computer vision, machine learning, and prototype processing and at present information technology plays a major function in real-fourth dimension operation which is very important in today's systems.
Step1- Install Flask & OpenCV :
Yous can use the 'pip install flask' and 'pip install opencv-python' command. I use the PyCharm IDE to develop flask applications. To hands install libraries in PyCharm follow these steps.
Step2- Import necessary libraries, initialize the flask app :
Nosotros will now import the necessary libraries and initialize our flask app.
                      #Import necessary libraries
from flask import Flask, render_template, Response
import cv2
            #Initialize the Flask app
app = Flask(__name__)
Step3- Capture Video using OpenCV :
Create a VideoCapture() object to trigger the photographic camera and read the first prototype/frame of the video. Nosotros tin can either provide the path of the video file or use numbers to specify the utilise of local webcam. To trigger the webcam we pass '0' as the argument. To capture the live feed from an IP Camera we provide the RTSP link as the argument. To know the RTSP address for your IP Camera go through this — Finding RTSP addresses.
          camera = cv2.VideoCapture(0)          '''
for ip camera apply - rtsp://username:password@ip_address:554/user=username_password='password'_channel=channel_number_stream=0.sdp'                    for local webcam utilise cv2.VideoCapture(0)
'''
Step4- Calculation window and generating frames from the camera:
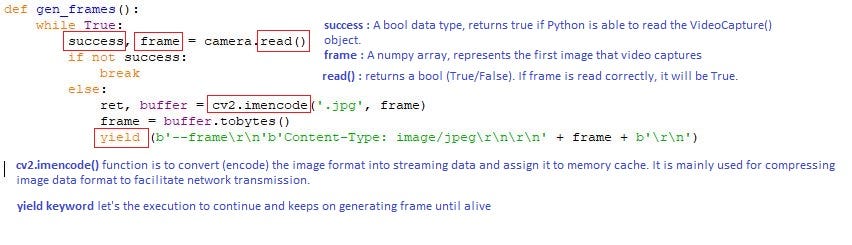
The gen_frames() function enters a loop where information technology continuously returns frames from the camera every bit response chunks. The role asks the camera to provide a frame and then it yields with this frame formatted every bit a response chunk with a content blazon of paradigm/jpeg, as shown above. The lawmaking is shown below :
Step5- Define app route for default folio of the web-app :
Routes refer to URL patterns of an app (such equally myapp.com/home or myapp.com/about). @app.route("/") is a Python decorator that Flask provides to assign URLs in our app to functions easily.
          @app.road('/')
def index():
            return render_template('index.html')
The decorator is telling our @app that whenever a user visits our app domain (localhost:5000 for local servers) at the given .route(), execute the alphabetize() function. Flask uses the Jinja template library to render templates. In our application, we volition employ templates to render HTML which will display in the browser.
Step6- Define app route for the Video feed:
          @app.route('/video_feed')
def video_feed():
            render Response(gen_frames(), mimetype='multipart/ten-mixed-replace; boundary=frame')
The '/video_feed' route returns the streaming response. Because this stream returns the images that are to be displayed in the web page, the URL to this route is in the "src" aspect of the image tag (run across 'alphabetize.html' below). The browser volition automatically continue the image chemical element updated by displaying the stream of JPEG images in it, since multipart responses are supported in most/all browsers
Let'south have a look at our index.html file :
          <torso>
<div grade="container">
            <div grade="row">
            <div class="col-lg-viii  offset-lg-2">
            <h3 form="mt-v">Live Streaming</h3>
            <img src="{{ url_for('video_feed') }}" width="100%">
            </div>
            </div>
</div>
</body>
Step7- Starting the Flask Server :
          if __name__ == "__main__":
            app.run(debug=True)
app.run() is called and the web-application is hosted locally on [localhost:5000].
"debug=True" makes sure that we don't require to run our app every time nosotros makes changes, we can simply refresh our spider web page to see the changes while the server is notwithstanding running.
Project Structure :
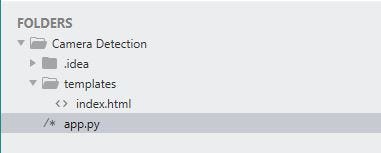
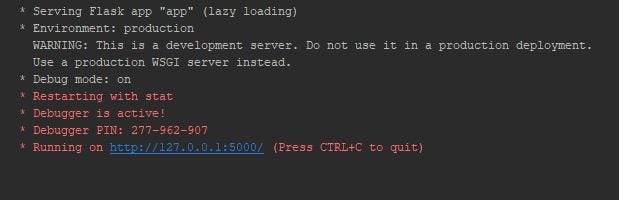
The project is saved in a folder called "Photographic camera Detection". Nosotros run the 'app.py' file. On running this file, our application is hosted in the local server at port 5000.
You can simply blazon "localhost:5000" on your spider web browser to open up your web-application afterwards running 'app.py'
- app.py — This is the Flask application we created above
- templates — This binder contains our 'index.html' file. This is mandatory in Flask while rendering templates. All HTML files are placed under this binder.
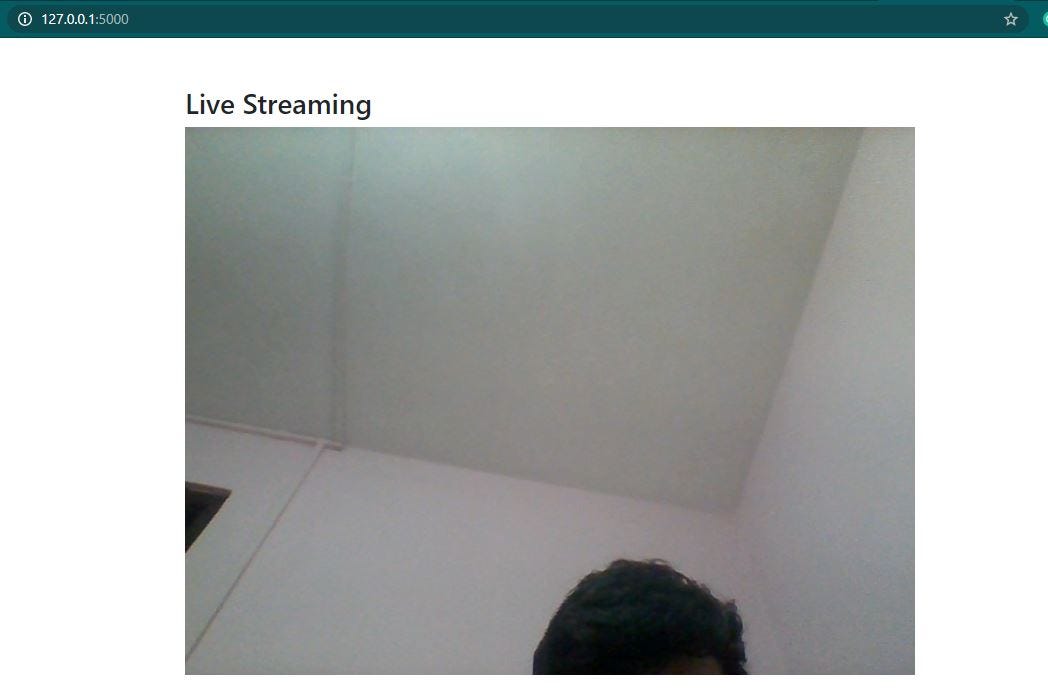
Allow's see what happens when we run 'app.py' :
On clicking on the provided URL, our web browser opens up with the live feed. Since I used VideoCapture(0) above, the webcam feed is displayed on the browser:
And that'due south information technology !!
You lot have the live video stream from your IP camera/webcam on your spider web browser which can exist used for security and surveillance purposes.

Refer to my GitHub Code.
Note : All the resources that y'all will require to get started accept been mentioned and their links provided in this article every bit well. I promise yous brand good utilize of it :)
I hope this commodity will get you interested in trying out new things in the Computer Vision domain and help you add together to your noesis. If yous have enjoyed reading this article do share it with your friends and family unit. Thank y'all for your time.

Source: https://towardsdatascience.com/video-streaming-in-web-browsers-with-opencv-flask-93a38846fe00
Posted by: upshawwishoune1988.blogspot.com
0 Response to "How To Live Stream From A Video Camera"
Post a Comment